torsdag 29 december 2011

Moving to farmer's racer


The new blog is ready for 2012. Klick on the picture to get to the new website. Recycle motorcycle will no longer be uppdated - all news will be posted on farmer's racer.


Wellcome

fredag 16 december 2011

Detail work


Finaly the major construction work on the side panels is done. I gave up the idéa of hair pin fasteners as they would reach to far outside the round shape of the nuts. Ended up – as usually – with a home made wire fastener. To solve construction idéas with wire, is so common within the Swedish farming comunity that it has got it’s own name: farmer’s weld:)
There is still some metalwork to be done on the panels. One or two edges will be bent, maybe some surface work. The finish can end up in two different estetics: perfect new look, or worn surfaces. To make something look new is the easy one, but I’m aiming on the more difficult path of making a new part blend in with the old bike.


söndag 11 december 2011

Designers tips


If something looks ugly – make five more of them and ugly becomes ”this is rare man”. It’s much better to be rare than ugly:) Six ugly nuts have been made for the side panels. Looked all over internet for oldschool fasteners, but ended upp making my own. The design of the quick locks that I found belongs to much faster bikes than mine.
A little time by the lathe transformed 6 washers and m8 nuts into a tiny welding job. The notch in the nut is made for a hairpin sprint. I need to get an easy access to the sparkplug behind the panel. To prevent me from getting more gray hair I will make a little wrench for the custom nuts – kept together with the ignition key.

Some adjustments will be made to both the nuts and the panel fittings before the holes for the hairpins will be drilled.

söndag 4 december 2011

Panels in place


The panels are mounted on the bike. The exact possition is adjusted with leather washers. The three mounting points feels quite solid, and I hope that the panels wont rattle to much when the engine runs. If they rattle to much they will cut a nice little hole in my dragin jeans. My knees is just reaching the back mounts - I will need to make well rounded custom nuts to save the clothing. I could not resist throwing some paint on the panels, just to get a picture of the result to come. This is just a color sketch with an of white to match my vintage jacket. This will serve as a backdrop to a number and some sponsor logos.


onsdag 30 november 2011

All in place


All the stainles rods are now in place. By beeing quite exact at this stage I make it easier to place the holes in the panels as symmetric as possible. But I'm sure that I will get gray hairs because nothing else is the same on both sides. Even the gas tank is mounted of center by one full centimeter. Probably a monday morning gas tank from the yamaha industries. Now it's just a matter of cutting 5 millimeter of the rods at a time to place the panels at an equal distance from the tank. No more measuring - just looking and walking around.

måndag 28 november 2011

Top fitting


There are two kind of welders in the world. The ones that makes it look so easy and simple - and the ones that make it look like the most difficult task in the world. I'm the later one. It is no use to compete with the skills of my contractors. But at this prototype level it is quite fun to "glue" metal together:) This is the top, front fitting of the side panels. Mounted on the gas tank supports with the possibility to make some minor adjustments to the panels.


torsdag 24 november 2011

Fairing fittings

Workshop obsessions - can not put any new bolts on my old bike. All the parts I saved when I stripped the bike is now good to have. Found a couple of M6 to mount the first fittings of the side panels.


Pins are starting to stick out of the frame in different directions. First attempt was to weld some sort of clamp for the center tube of the frame. But my style-police-me immediately censored the idéa. The clamp design looks to cheep. I need to find something under the tank, solid enough to hold the top link to the panels.

onsdag 23 november 2011

Engine hiding


It works - if one wants to show something in design, it pays of to hide it. The engine looks more massive behind the side covers. The aluminum I got was stiffer than I thought - but I got the edges quite equal on both sides. The curve of the plates follows the tank, and opens up at the front of the frame. I will need three fixing points to hold everything in place. I´m dangerously close to design custom nuts and locking pins for the panels. Can hear my self cursing my own design in a future roadside brakedown..:)

The basic shape of the panels is done, and I cant do anything more before the supports and fittings are in place. After that I can start working - getting all gaps and distances correct.


söndag 20 november 2011

Paper fairing


A whole day with scissors. It is a tricky to get the same impression of both sides of the bike. The left side of the engine is far less decorated: no kick, no oilfilter and no exhaust system. The side panel will also be higher on the left side. The quickest way to compare is to make paper scetches, tape them on and walk around.  When one is smiling for a whole lap the work is done.


Time to transfer the paper models to aluminum. I could have done this in my computer but I´ve learned that the curves chosen by computers are different to the ones made by hand. And I want the panels to have a home made feeling - something added to the bike by the owner.

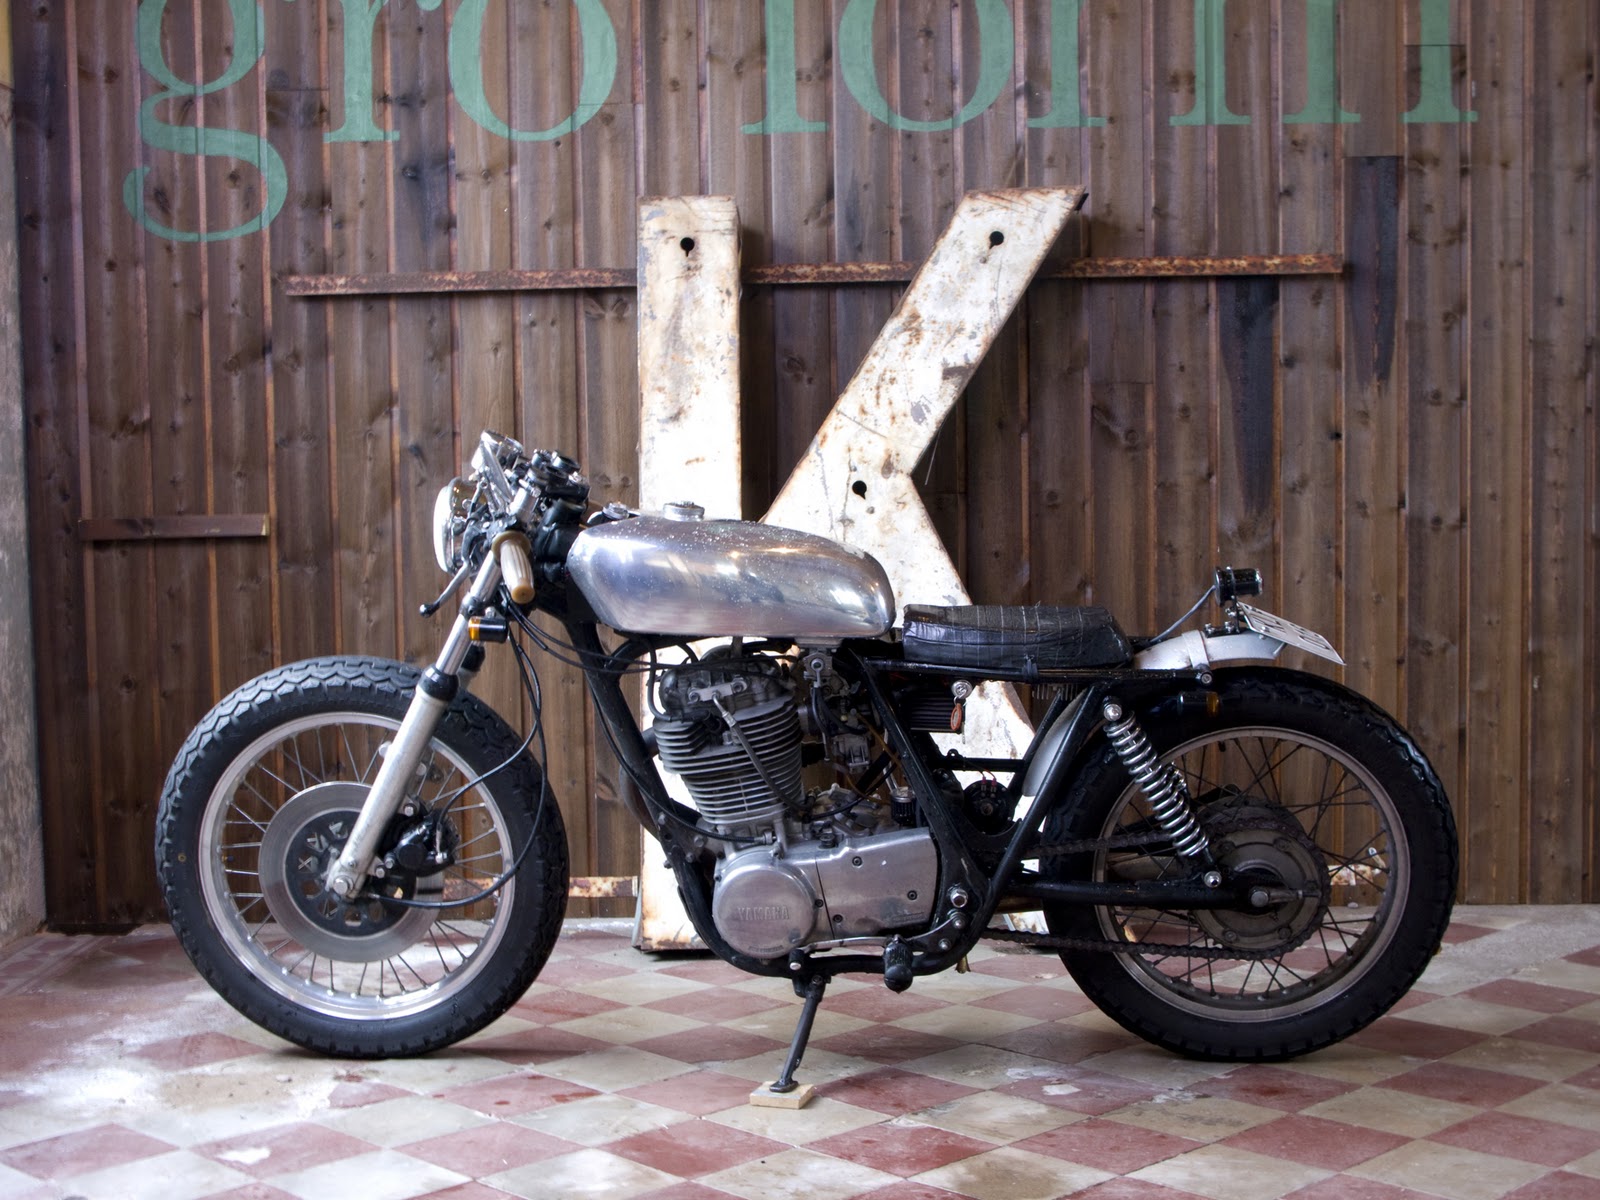
The distance to the tank is dictated by the right hand side of the engine. The cam chain takes a lot of room, and that gives the feeling that the whole engine is mounted of center. I need a good air flow around the engine, so the right side distance to the tank is transfered to the left side. The room between the panel and cylinder will therefore be bigger on the left than on the right hand side.

The aluminum is new and shining. But I will work a lot with adding an ugly accent to the design (no problems with my limited metal skills). Some wear and tear to match the rest of the almost 30 year old bike. My friend, Mats, came up with the idea to make some extra holes, as if the panels were a part of a bigger fairing, or even dents and rips.


onsdag 16 november 2011

Brand preview


A brand is born. In the beginning of 2012 recyclemotorcycle will move to the new brand farmers racer. The blog will continue and there will be additional subjects to motorcycles and motorcycle gear. Get a sneak preview of the brand by clicking on the picture above.

torsdag 10 november 2011

Wood sketch

Strange fairings are being built in the woorkshop. I have come to the conclusion that I want to use my front end design for one more year - no big front screen. The fairing design is now stripped down to side panels - a perfect place for a numberplate. Through the wood sketches I´ve learned that the curve of the panels is very small. So small that I think i will invest in a good hammer and some aluminum sheet metal. I´d rather spend the winter hammering than messing with glass fiber and resin:)

torsdag 3 november 2011

Tarp prototype


The first prototype of the wrench turning tarp is comming together. The material looks promising and it will be easy for all the customers to recognise the orgin from tyres - both by the weight and texture. After many hours of testing in the workshop I´m already addicted to the little room, around the bike, created by the tarp. It is much easier to keep track of all the tools on the rubber carpet than spreading wrenches and parts all over the floor.


The tarp will be sold under a new brand. Sadly recyclemotorcycle is occupied by a recycled motorcycle shop in US, and this will create some confusion. But a new domain is on the way and this blog will be moved during the winter to the new domain and brand. I will keep you all informed when and were this will be done.

onsdag 2 november 2011

Riding november


Went for a ride just to be able to say - drove my bike untill november. I did reach the 3500km distance this summer, but this last ride was not a holliday. My friend Mats had to turn back home to get a new head light bulb, and this was only the beginning. After this it took us about one hour to get both machines running at the same time. While one motor was idling in the autum breeze, the other bike refused to ignite. Hudududuf - hudududuf - hudududuf. My bike was training my right leg more than my friends leg/bike configuration. All the tricks in the book was used to get my bike running. But as soon as one bike started, the other one gave up. - Test to kick with a full open throttle (Mats idea)... I kicked down hard, and: BANG. It started:) but the engine celebrated by blowing two light bulbs in the process - the tail light and the left turn signal said good bye. No such bulbs in my hometown. Nearest shop is in Kalmar - 25km of illegal racing on small roads and cow trails to reach the shops back door. - My bike back fires, was my friends first words in Kalmar. - The exhaust is shaking. And his diagnoses could not be better. One of the nuts, holding the exhaust system to the cylinder head was somewhere in between where it should be and the neighbourhood. The drive back home was a nice symphony of explosions, rattling metal and not so functional bulbs. But we did drive in november this year!


Thanks Mats for all the laughs:)

torsdag 27 oktober 2011

Wrench turning tarp

The picture above is from the early days of the rebuild - taken one year ago. A lot of the work on the bike has been done in delicate environment. As oil change on vintage wooden floors or valve tuning on the kitchen table. As a designer I get in contact with a lot of interesting manufacturers, and new materials is developed every year. I just found out about a rubber tarp, made from recycled car and motorcycle tyres. The use of it today is floors in stables and decks on aluminum boats. I have a shipping on the way to my office. The plan is to start producing recycled rubber tarps for motorcycle builders. Specially cut to fit under a bike when you need to protect the floor - or if you have the habit of breaking down in nature. No more missing bolts in the lawn - no more oil in nature or on the sandwich. The tarp will be made in different sizes and models. The goal is to have a small production running before christmas.

söndag 23 oktober 2011

Bar end mirror

Finaly the bar end mirror is complete. Custom made for the bike. I had a lot of trouble finding a design that did not add to the width of the bike. With triumph grips, measuring 16 centimeters, there is no need for a mirror that hangs outside the bike. It is easy to move the hand on the grip in order to get full view of the world behind you. The connection to the clipon is two metal tubes with a diagonal ends. The inner tube and the rod to the mirror is threaded. When the mirror rod is turned around the clip on the metal tubes presses together and expand.


Trying to mount my camera on the bike - but the movies gets blur. The positive thing is that the valves finaly seals perfect to the seats. Compression is now over 150 psi. And I have 200km to go before the engine is tuned in perfectly. The vibrations is there, and the roar is comming back. And the rear view mirror spinns like a propeller when I hit 90 km/h:) Need to tighten some screws even more...

tisdag 18 oktober 2011

On the road


The engine is running, and I still got a few weeks before the first snow will fall i Sweden. This is the scenery that made me build my motorcycle - a small paved countryside road, autum leaves and a little bit of mist in the air. Nothing else to do than breaking in a new engine...


If I add up all the tips on the internet about breaking in engines the result is useless. Some say; be extremly carefull the first 100km. Some say; beat the engine hard. Some say; never idle. I say; this is not a racer. I want the engine to respond to my wishes. I want the bike to be easy to drive. So I´m mixing the Yamaha instructions of taking it easy with the forged piston demands of beating. The formula of it all is avoiding lowest and highest revs. Use the throttle midrange. Use engine brakes a lot to distribute the oil evenly. Change oil and filter after 500km. - I will keep You informed if the engine blow up...


There is though a question mark. I got 150psi of compression but the horsepower is not there. And the bike does not sound as much as before. But it runs very steady and precise - nothing sounds wrong. I am posting on several forums to find out if this is ok. There is a small leakage of oil from the kick indicator, so I will take the engine apart again during the winter. I just want to tune in the piston in the autum breeze.

söndag 16 oktober 2011

Assembly sentimental


Is there such a diagnoses? Can´t help but feeling a little sad while putting the motor together. I have got so use to the interrior of the engine that I´m allready missing the looks of the machine behind the covers. I hope the sound and the revs of the motorcycle will make me forget.


The new piston and cylinder sleeve is shining. It is not likely that the 400cc engine will reach 10:1 compression - as the 500cc will do with this piston. But I hope that it will make a little difference.


Valve mounting. The assembly is done with a custom made tool - to avoid accidents. The dismounting was made a week ago with a simple wood workshop clamp and a short metal tube.

torsdag 13 oktober 2011

Lapping valves

New valve guides in place, but no grinding tool in the workshop. It took me the whole night to adjust the valve seats with coarse paste. After six hours two fine, red, full circles appeared. Time to go home and rest the palms. To morrow it is time to do the final lapping with fine paste. When I decided to replace the valves and adjust the valve seats I did not know if it was necessary. Didn´t have any idea if they were worn or not. But when I push the new parts into possition I can see the difference, and the guides are much tighter - no need to measure. The old valves were broken in all possible ways. Happy to find the reason for the lack of compression.

fredag 7 oktober 2011

Speed cable

My engine trimmer is driving motorcycles as well - good to know. But he drove a little bit to much with his ribs a few days ago. He broke one and cant trim my motor until next week. In the meantime I´ve been working with the speedometer cable problem. I wanted to put my only gauge in the centerline of the bike, but there is no room because of the head light. I could have made more room by moving the light a bit forward, but that gives the impression of the light driving on its own - a bit ahead of the rest of the bike. As a designer I know that good design is measured in millimeters and a good day´s work. The 5 1/2 inch head light is not big - but it is in the way at exactly the wrong spot. Two holes were the only way to solve the problem. I used two rubber bushings, left over from the top triple tree, to guide the speedometer cable through the holes. Absolutely no room left over in the headlight housing. Had to remove all the standard connectors - use simple cable lugs - bend the H4 bulb pins in different directions - in order to get all the parts together.


The textile on the gauge is a linnen cloth from the local paper mill...

tisdag 4 oktober 2011

A Kedo moment


The package has arrived. Finaly it is time to put things together again. The people at Kedo has a good tradition of keeping all of their products in stock = quick delivery. They also have the habit of putting candy in the packages to bring the unpacking to a true Kedo-moment.


While the top and cylinder is taken care of by the professionals at Eliasson´s racing, I´m getting low behind the front light. The tt handlebar (of my own design) has been replaced by clip on bars from kedo. To fit in with the worn surfaces of the rest of the bike I used the heat resistant paint again. It creates an iron like structure to the otherwise shining crome of the new handle bars.


The speedometer is moved to a center position, and lowered to the level of the top triple tree. The down side to the compact design is that I now have to drill two holes in my bates headlight to lead the speedometer cable to the wheel...


The tiny electrical system and the small throttle handle is good to have when the angle of the clip on is adjusted. Even with this small components I needed to restrict the steering angle with a few degrees.


måndag 26 september 2011

Cylinder head cleaning


The cylinder head was full of burnt oil. The perfect tool to remove this is a sharpened nylon stick. Soft enough to not leave a scratch, and hard enough to chip the cole from the metal. The result is a good surface to polish. I left the old valves in to protect the valve seats. The company www.Kedo.de is shipping new valves, seals, guides and a new Wiseco high comp piston for the engine. There is no obvious reason for the lost of compression. Just the result of leaking oil into the cylinder. I will take no risk - both top, sleeve and piston will be reworked. The lokal Yamaha supplier Eliasson Racing will do the bore of the cylinder sleeve.


The original surface of the top.


söndag 25 september 2011

The winter workshop


Setting up the winter workshop now. Moving all the tools and equipment from the 170 square meter powerstation into a 20 square meter office. It is in here the fairings will be built, starting in a few months. The renovation of the engine is in progress on the table. More pictures comming soon.


måndag 19 september 2011

BBQ in the color of grey

This weekends bbq had a special guest - the rain. Mats was one of the visitors that gave the weather a good fight - by bringing his bike. A sr500 from 1978, rebuilt during the winter 2010. The dunlop tt100 kicks up some serious amount of moisture from the road (no mud guards on this bike). Aluminum tank form Japan and custom made rear frame work. 2" drop in the front and clip on´s creates a very small and powerfull machine.

Karl decorated the parking lot with his low ride german master peace. He is planning to build a bike in the same style in the near future...